LAF or RAF? (The Sectional Talk)
Finding your way - on the road or in life - doesn’t come easy to everyone. But I think we can safely agree that if you’re reading this, you at least know the difference between left and right.
That is, until you go furniture shopping and someone asks you something like: “Which side - Left or Right?” In a hurry? Don’t have time to read my whole blog? Who does? I get it. If you are in a hurry, then scroll to the RECAP at the very bottom of this post.
Still with me? Cool. Read on.
* * * * * * * * * * * * * * * * * *
UPDATE! RECENT DEVELOPMENT AS OF 2024: Several (NOT ALL) of the furniture retailers out there have dropped the “F” and are referring to their sectional pieces as simply Left-Arm or Right-Arm now. If I were the paranoid type, I’d think they did this JUST to make this blog obsolete. But it’s not obsolete - I checked. LAF/RAF is still alive and well. Continue…
* * * * * * * * * * * * * * * * * *
SECTIONALS, CABINETS and DOORS, OH MY!
The biggest offender to the mystifying question of left or right seems to be the sectional sofa. But it doesn’t stop there. Ever try to buy a doorknob or order an insert for a blind-corner cabinet? If you’re thinking hey, I just came here to figure out what LAF and RAF mean. Not to worry. I’ll focus on the left or right question as it pertains to the almighty sectional. It’s a hefty price tag, so you want to be sure to order correctly. I’ll save the doorknob and corner cabinet insert discussion for another blog.
NOT SO FAST. LET’S START WITH A DISCLAIMER.
For the purpose of this discussion, we are talking about sectionals that have an arm on either end. Yes, there are many “open” options. Hush. That will only confuse those who, like me, might succumb to varying degrees of overthinking. Also, for similar reasons, the following related terms will NOT be addressed in this post: LCF/RCF, LAS/RAS and LHS/RHS. Were talking about the most common terminology right now - LAF/RAF. Let’s focus, people.

What is A Sectional?
Don’t overthink it.
LAF or RAF? DEFINING THE SECTIONAL
What is a Sectional? A sectional comes in pieces - or “sections” - that fit together (hence the name, SECTIONal.) Each section is either a corner piece, a middle piece with no arms, or an end piece. The end pieces (whether they are a chaise or a sofa) will have an arm on one side and no arm on the other. LAF or RAF refers to the position of the arm.
Some sectionals are simple - like a sofa with a chaise on one end. So let’s start with the simplest first. And I find that when you begin thinking about the sectional IN SECTIONS, as individual pieces that appear separately on your furniture order, then you can piece together your puzzle more logically and feel confident you’ll be ordering the right (I mean…) correct items. Below are common sectional combinations.
The simplest sectional configuration combines a sofa with only one arm and a chaise seat with only one arm. (What’s a chaise? That’s the seat that’s long, so you can put your feet up as you sit.)
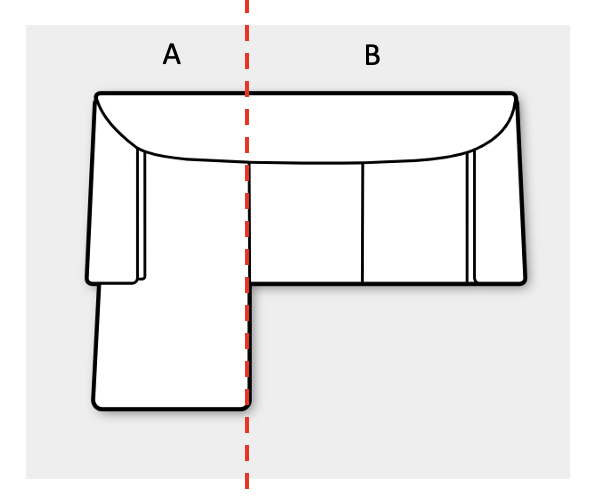
The Simple Chaise Sectional
The simplest sectional configuration is a sofa and chaise combination. Here, a LAF Chaise (A) is combined with a RAF sofa (B). The red dotted line shows where they connect.
The armless sides of the chaise and sofa meet to create a single “sectional” sofa with a chaise on one end. When ordering this type of sectional you’ll be asked to choose which side you’d like your chaise - LAF or RAF? I can hear the audio of the needle scratching the record as you ask…
WHAT THE HECK IS LAF and RAF?
At this point, AF might trigger another acronym. But in the furniture world, AF stands for “Arm-Facing”. The “L” and “R” are Left and Right.
LAF = Left-Arm Facing.
RAF = Right-Arm-Facing.
OK, GOT IT. BUT WHAT DOES “ARM-FACING” MEAN?
Don’t overthink this one or you‘re a goner. Trust me. (To all you fellow grammar nerds out there, the placement of the word “facing” is the culprit, IMO - we can parse that one out in the comment section if you like.)
THE INTENDED MEANING of LAF and RAF
If you are sitting down in a sectional right now, PLEASE GET UP. If you are sitting in the sectional, you risk not being able to understand this section. I know it’s comfy, I know you're testing out how it feels. Stop that. Do you want to know how to order the darned thing or not? So get up. Now turn 180 degrees so you’re facing the sectional. FACE THE SECTIONAL. Okay, now that you’re in the correct position, you can begin understand the meaning of LAF and RAF. Got it?
(Sorry, I didn’t mean to get all aggressive there.)
If YOU are FACING the chaise sectional and the arm of the chaise is on your left, then you are looking at what is called a LAF chaise.

Facing the Sectional
This illustration shows a person standing and facing the sectional, pointing at the chaise portion, which is also on the person’s left. This is what a Left Arm Facing (LAF) sectional looks like.
Conversely, if YOU are FACING the chaise sectional and the arm of the chaise is on your right, then you are looking at what is called an RAF chaise.
If you need a sectional with a chaise on the left as you look at it, you’ll order the LAF chaise with the RAF sofa.
If you need a sectional with a chaise on the right as you look at it, you’ll order the RAF chaise with the LAF sofa.
ARE YOU STILL WITH ME? GOOD.
If not, read that part above again before moving on.
WHAT ABOUT MORE COMPLICATED SECTIONALS? Happy to oblige. Keep reading.
THE “U” SECTIONAL

The “U” Sectional
Yup, it’s shaped like a “U”. The above image shows two chaise pieces (one LAF, the other RAF) with an armless sofa between.
The bottom image shows two corner pieces with an armless sofa between, with both an LAF and RAF sofa on either side to form the “U” shape.
A “U” sectional is made up of a center section with two (sometimes) matching pieces - one on either end of the configuration, so the result is a “U” shape. If the two matching pieces are chaises, then you’ll order a LAF Chaise, a RAF Chaise, and some type of armless chair or sofa between. If the matching pieces are sofas, then your connecting section will be either two corners and an armless sofa between, or else just a sofa that is made to add on two armless sofas (yes, a LAF and a RAF). You can also create a “U” sectional made of a chaise and a sofa combination like the one pictured below.

This is also a “U” Sectional
This version of the “U” is made of (working from left to right): a LAF Chaise, an armless sofa, a corner piece and a RAF sofa.
THE “L” or CORNER SECTIONAL
An “L” sectional is a combination of a corner or wedge piece with either 1) a one-armed chair (plus an armless chair or sofa) or 2) a one-armed sofa piece on either side. This combination creates an “L” shape. Sometimes each side of this sectional is equal in length, sometimes they are not. If you have have the #1 combo described above, your sectional has 5+ pieces and you can reconfigure your “L” by swapping the armless sections between the corner and end pieces. If you have #2 above, you have a 3-piece sectional and there is no changing it without bringing in additional pieces. It’s important to think ahead when ordering, especially if you ever want to change how your sectional sits in the room. Instead of purchasing an armless sofa on one side, consider two armless chairs instead.

The “L” Sectional
Two examples of an “L” sectional. Some have equal sides, others have one shorter and one longer side. Both are shaped like, you guessed it, an “L.” The red dotted lines show how each sectional is configured.
RECAP
If you read the whole blog, the following should totally make sense to you now. If you skipped ahead, I appreciate your “don’t-have-time-for-nonsense” attitude, but there’s a chance you might still be confused. Go back if you need help. I won’t judge. I’m just here to help.
Here’s the scoop:
Sectionals are made of sections that fit together. Each section is either a corner piece, a middle piece with no arms, or an end piece. The end pieces (whether they are a chaise or a sofa) will have an arm on one side and no arm on the other. LAF or RAF refers to the position of the arm.
LAF = Left Arm Facing. This means as you stand, facing the sectional, the piece in question has an arm on the left as you face it.
RAF = Right Arm Facing. This means as you stand, facing the sectional, the piece in question has an arm on the right as you face it.
NEXT STEP
Now go forth and order that sect—- WAIT, WAIT, WAIT, BACK UP. Did you measure your space first? Will it fit in the door of your home? Will it make its way up or down the stairs? Will it fit in that elevator? If you hear yourself say something like “it should fit” then please for the love of all that is holy in decorating, dust off that measuring tape please! Draw a diagram. Put tape on the floor where the sectional would go. Need more help? Call me.

How's it Hanging? (How to Identify AND Fix One of the most Common Decorating Mistakes!)
Are you making one of the most common decorating mistakes? As a decorator I am compelled to correct decorating wrongs when I see them. And when I see this common (but easy-to-fix) decorating gaffe, I speak up!
There are people in this world who won’t hesitate to correct your grammar, spelling or punctuation. (Have you met my husband?). He is compelled to right all writing wrongs: he will re-place your misplaced apostrophe, un-dangle your dangling participle, remedy your relative pronoun. Okay, honey, I appreciate that it’s your quest - we all make mistakes, we can all learn.

I have to admit, as a decorator I am similarly compelled to correct decorating wrongs when I see them. Like my husband (the self-titled Chief of Grammar Police), I can’t help myself. It’s one of the most common decorating mistakes, but it’s also one of the easiest to fix. So if I see something, I have to say something.
TRIGGER WARNING
The topic I’m about to discuss is a common source of disagreement among couples who share a living space. I don’t want to stir the pot, but here’s the deal. I am FINE with being the bad guy, delivering the news that one of you doesn’t want to hear. Are you ready?
(ONE OF) THE MOST COMMON DECORATING MISTAKE(S)
Here’s the truth: you might be hanging your art too high. When I'm in a client’s home and see photos, paintings or other artwork that’s hung too high up on the wall, I feel a tug at my soul. Yes, I might be in your home to suggest a paint color palette or to help you choose a kitchen backsplash, but if I see artwork that is hung too high, I won’t hold back. I can’t hold back. As the self-proclaimed Chief of Artwork Police, I promise I’ll be gentle about it, but I’m going to tell you the truth.
SIZE AND PLACEMENT
Let’s be honest. Taste in artwork is subjective. I could do an entire blog series on color, style, aesthetics, subject matter, and taste. So I’ll stay focused on size and placement for now.
When deciding where to hang a piece of art, I first consider the size of art. I like to look at the available wall space as if it were a frame around that art. If the empty wall area that frames the art is too large, then the art will look too small for the wall. If you’ve seen the Mona Lisa at the Lourve, you’ve experienced what it’s like to see a postage stamp-sized piece of art displayed on a huge empty wall. The Lourve can get away with it because, well, they’re the Lourve. They’re not your living room.
Conversely, if your art fits on the wall, but has no breathing room at all between wall edges, corners, door or window trims, then the art is too big. Bigger art can make a room look bigger, but if it’s crammed into a space, it has the opposite effect and can make your walls look cramped and cluttered.
What if all you have are smaller pieces of art? Consider creating a “gallery” grouping and treat the grouping as one larger piece when deciding where to place it. And remember - each individual piece in the grouping should relate to the next. Don’t hang them too far apart from one another - 2-3” is usually right.

USE COMMON SENSE (or THE UNBREAKABLE RULES)
Rule 1 - Artwork should not be in the way. If you brush up against a picture frame as you pass by or sit down, then it’s in the wrong place. As you use a stair railing, you shouldn’t be grazing an art frame with your knuckles - it’s either too big or needs to be hung higher (yes, you can hang art too low!).
Rule 2 - Artwork should be visible. Scale is important. Family photos, especially, can be tricky. If the heads of people in photos are so small that you have to get close to view them, then they are best placed on a bookshelf or desk, rather than hung on a wall. Groupings of smaller pieces can also work in hallways, where you can stop and admire each piece. Choose larger visuals for above a fireplace, bench or sofa - places you can view from varied distances.
Rule 3 - Hanging hardware is not permanent and should be unique to each piece of art. Just because there was a nail on the wall when you moved in does NOT mean that’s in the right place (or even the right type of hardware) to hang YOUR art. And if you move your furniture, remember that the art probably also needs to move too. Fill in the holes with spackling compound, touch up with paint, install new hanging hardware. It’ll be alright. Speaking of hardware, be sure to have the right tools on hand - see below for a list of our favorites.
HOW HIGH TO HANG?
Now you know the unbreakable rules, there are basic guidelines to help you determine how high to hang your artwork. Like everything that requires a creative eye, there are general rules and guidelines for decorating. Yes, some rules and guidelines can be broken - other rules (Rules 1-3 above) should not.
That said, there are three artwork height guidelines based on where your art will be hung: Seating, Relative and Gallery.
SEATING HEIGHT. As you sit reading this, look up at the nearest piece of art. If you have to tilt your head up more than 45 degrees to admire it, it's hung too high. The general rule is this: in a living room, family room, library - anywhere you sit and have conversation - place the art so when you're sitting, you only have to look up 45 degrees to comfortably view it.
Artwork over a sofa should relate to the size and placement of the sofa below. It shouldn’t hover up above, looking lonely and completely unrelated to the furniture or rest of the room.
Sofa
Over a sofa, the general rule is to use Seating Height (as you sit, the art is viewed at a 45 degree angle). Assuming the size of your art is large enough in relation to your sofa, the bottom of the artwork should be 6-12” above the top of the sofa. Some decorators get even more specific and say 8-10” above. I say it depends on the size of the artwork, the height of your sofa and, to some extent the height of your wall. In a typical home where ceilings are 8-9 ft high, as you sit on your sofa, there SHOULD be overlap between you and the artwork. No, you’re not going to hit your head on the art. No, it’s not too low.
RELATIVE HEIGHT. For artwork that is placed over a piece of furniture, the furniture, art and wall size should relate. What does that mean? It means that you should consider a) the size of wall that frames both the furniture and the artwork and b) how the shape and size of the furniture relates to the artwork above or nearby. All of these considerations together will help you determine whether the art is right for the space, and if it is, how high it should be hung.
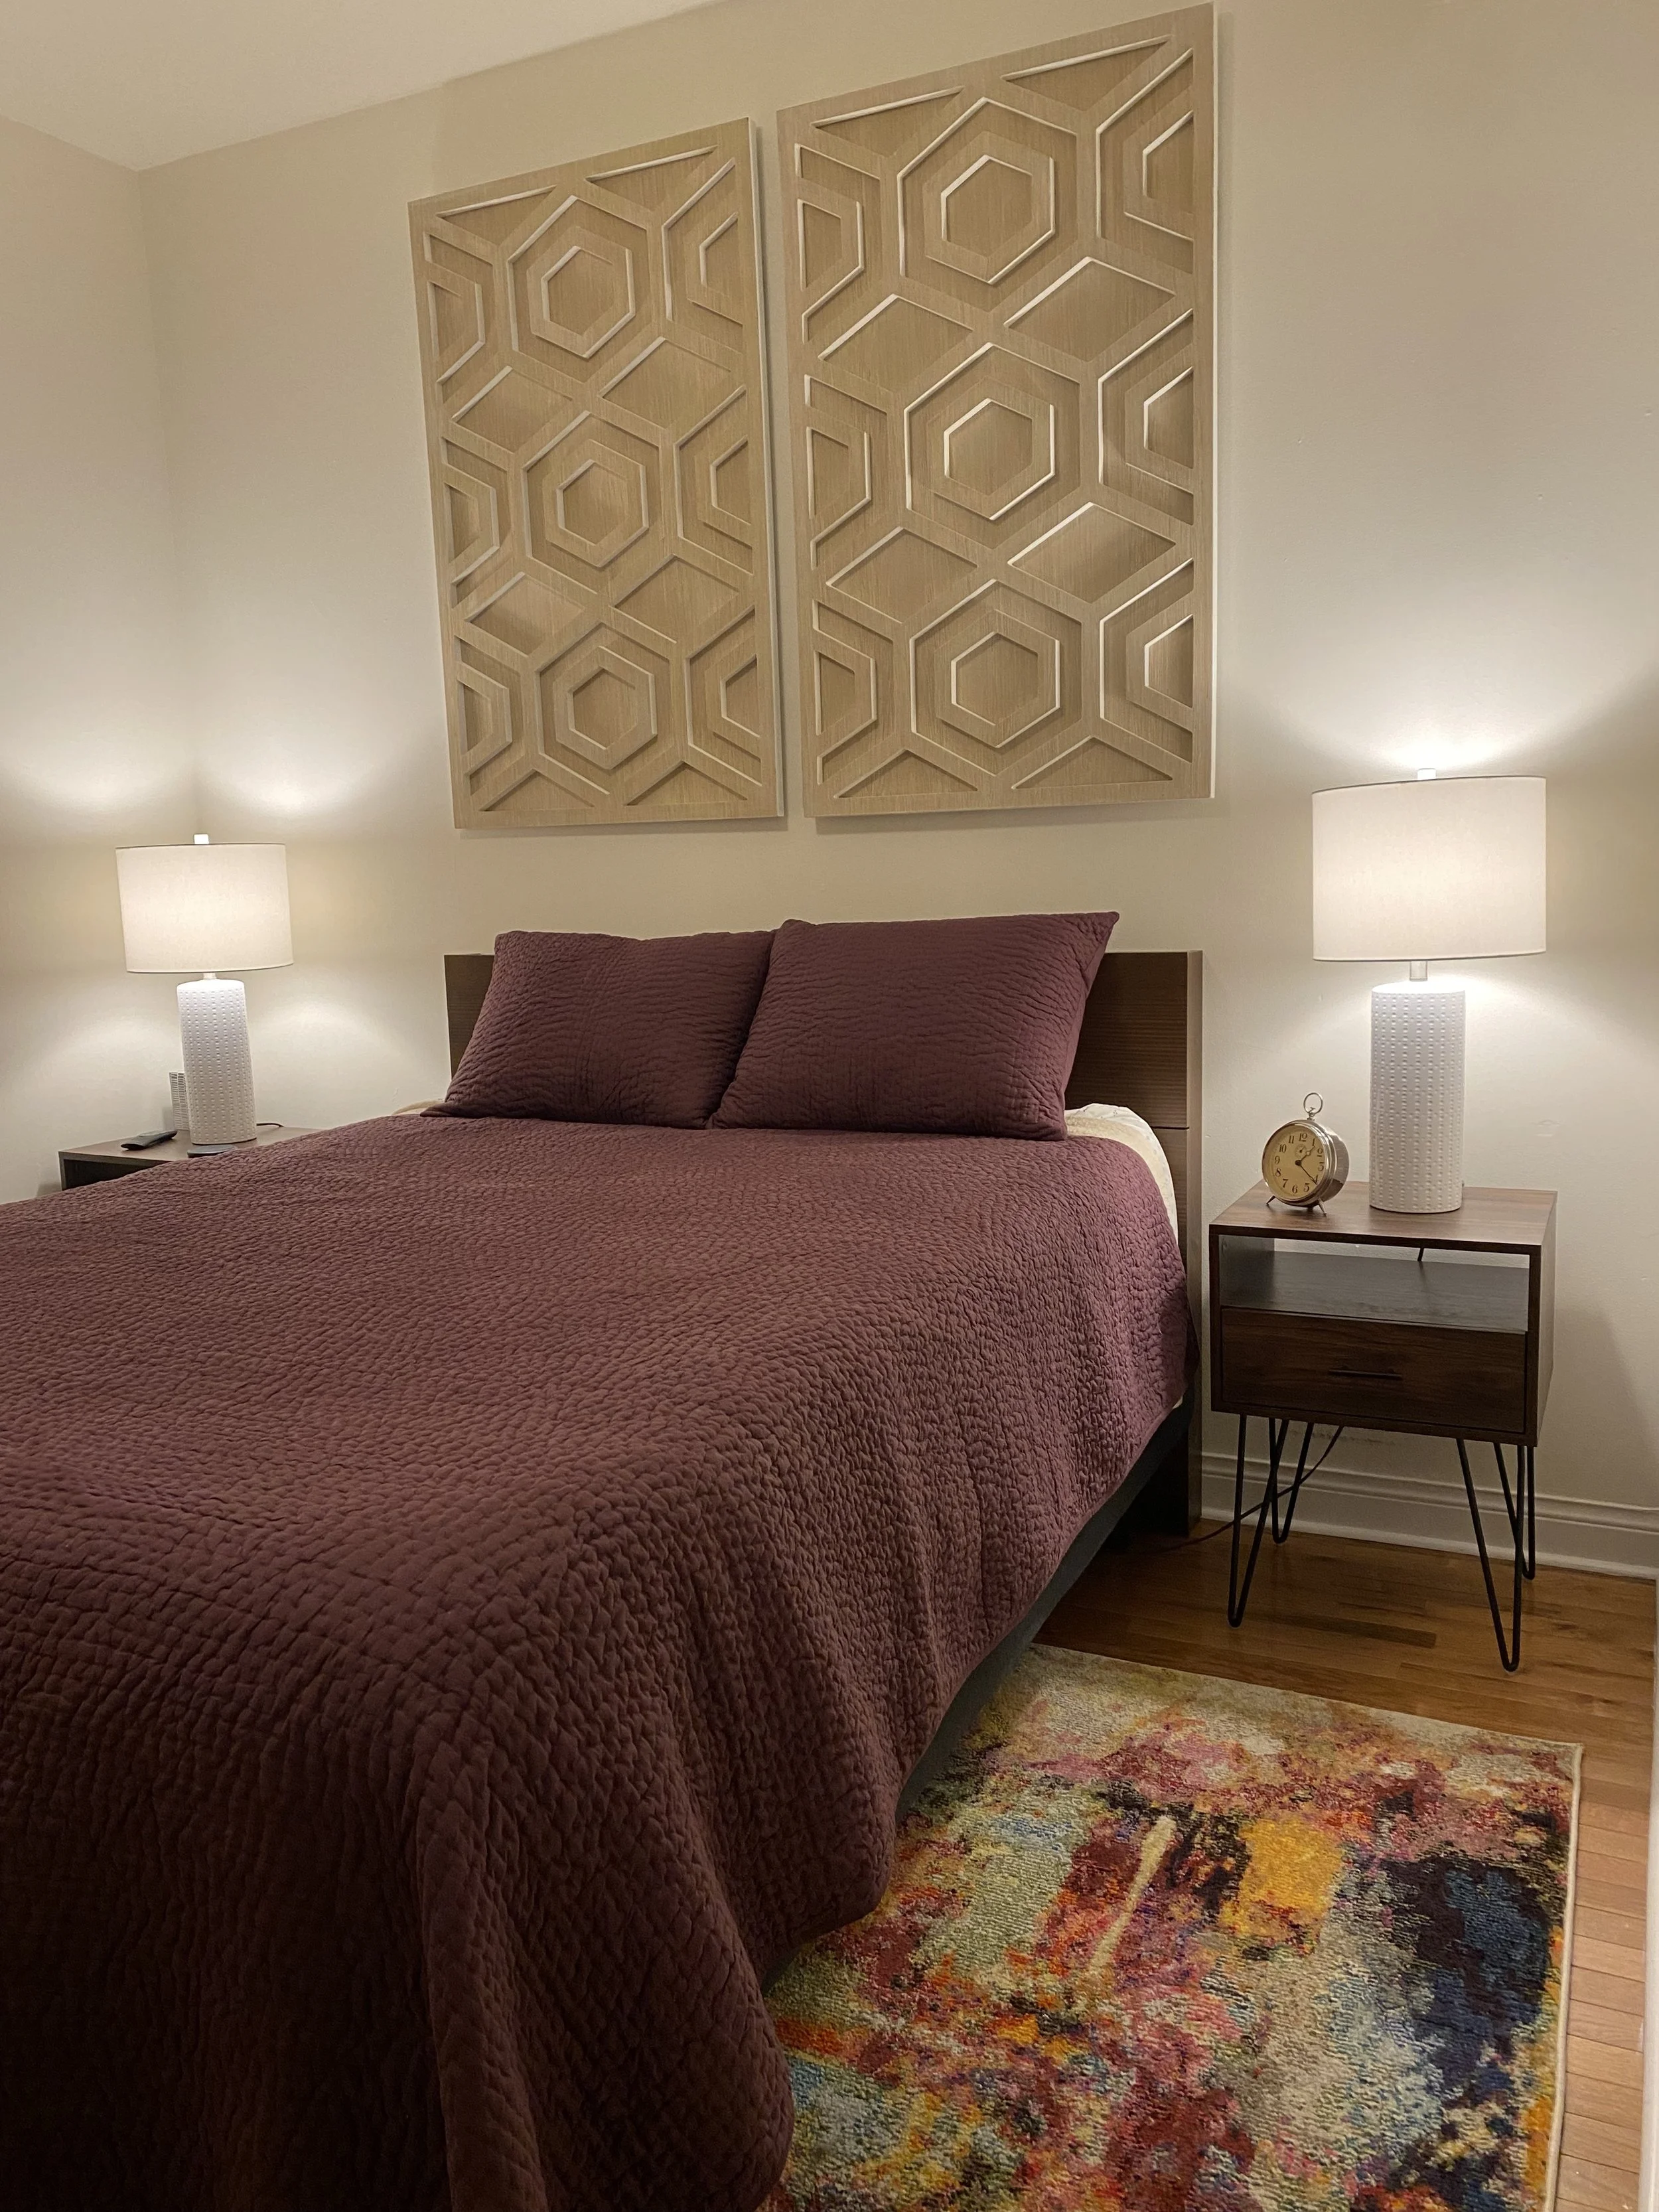
Artwork over a headboard, especially in a room with high ceilings, helps to bring drama to the room.
Headboard
Over a headboard, we use Relative Height. First you have to determine if the headboard is low enough or the wall is high enough to warrant artwork above. For example, a headboard that is over 54” high likely needs nothing above it. In fact, artwork over a tall headboard might even compete for attention rather than working in tandem with the bed. But for shorter headboards and tall ceilings especially, artwork above can extend the eye upward to provide drama in the room. Again, depending on the size of the art and the height of the headboard, we typically leave 6-10” between the top of the headboard and the bottom of the art. But let’s say you have a large square piece of art to place over a really low headboard? How that art relates to the large wall is actually more important than its relation to the low headboard. Placing it 6-10” to a headboard that’s only 30” above the ground would actually bring your eye downward instead of providing a strong focus in the room.
GALLERY HEIGHT (or PASSING height). You’ve probably heard that your artwork should be at “eye” level in the hallway and in other areas of your home where you are passing by. The “standard” for gallery height is to place the center of your artwork 57” up from the floor. This is a useful guideline, but it’s just that - a guideline. What if you and your partner are not at all the same height and "eye level" means something different to each of you? Compromise! Start with placing the center at 57” and nudge it an inch or two until you are both happy with the height.

Placing a mirror over a bench in a foyer provides a welcoming space for guests. They can take off/put on their shoes, and quickly check to see they look presentable. Here, lowering the mirror would look strange (and make the mirror useless to standing guests), so the bench pillows fill the empty space between the top of the bench and the bottom of the mirror.
Bench
A bench placed in a passageway or foyer is subject to both the Relative and Gallery Height rules. A big blank wall over a bench screams out for a large piece of art, art grouping or mirror. A large square piece, or art with a vertical orientation brings your eye from the bench upward, creating a focal point in the room. The width of art above a bench should not exceed the width of the bench (again, a good rule of thumb is 2/3rds the width of the bench). How high you place the art over a bench depends on the height of the art. If you use the Gallery Height rule, but the art is so tall that the bench will sit in front of the art, then raise the art so it’s 8-10” above the top of the bench. If the artwork is so deep that when you sit on the bench, you might touch the art, then bring in a different piece of art that makes more sense for the space.
HOW TO FIX COMMON MISTAKES
So what if you now realize you’ve mistakenly placed your art too high? Maybe it’s WAY up there, between the top of your head and the ceiling. I’m not going to judge - we all make mistakes and it’s going to be okay.
First, make sure the size is correct in the first instance. If it’s too small in relation to the wall or the furniture nearby, substitute the art with a piece that’s larger, or bring in additional smaller pieces to create a grouping that together, form a larger piece. A good rule of thumb is for the artwork to be 2/3rds the size of the furniture below it. Just make sure that as you gaze up toward your art when you’re sitting, you’re not craning your neck to see it. It should be an easy 45 degree tilt of the head to admire.
As you walk down the hall, does it seem like those people in that portrait up there are looking out over a cliff, gazing into a far-off horizon? If so, bring 'em down so the center of the portrait is at eye level. And are the people in the portraits large enough to discern? As you walk through the hallways of your home, you should be able to easily view the art or photos as you pass by.
OUR FAVORITE ARTWORK HANGING TOOLS
Ready to hang your art? Be sure you have all of the supplies you need. Below are my top 7 must-have tools if you’re going to install your own artwork. As an Amazon Associate, I earn from qualifying purchases.
1) A Self-Centering Measuring Tape - WHAT? It’s just like it sounds. No need for a calculator. Measure your wall, your sofa, your art, then look below the top measurement to see your center point.
2) A Self-Leveling Cross Line Laser Level with Horizontal and Vertical Lines
3) A Magnetic Stud Finder - Look Ma, no hands! Seriously our favorite analog tool ever. This little powerhouse fits in a pocket, takes no batteries, and never fails to find the nails in the studs behind the wall.
4) A Picture Frame Hanger Tool/Picture Hanging kit - This this little yellow hanging tool is a game changer for hanging lightweight artwork and framed photos.
6) A Rolling Tool Tote Bag with Telescoping Handle - Keep it all together and look like a pro at the same time. We love our rolling bag. Plenty of room for our tools and hanging hardware.
7) A Curved Claw Hammer. Make sure yours feels balanced in your hands. It’s the most important tool!
Armed with this knowledge, take an objective look at where your art is hung now, then remember Rule 3 - Hanging hardware is not permanent; it can be moved. Rehanging your artwork at the right height will make your home look more polished and feel more inviting. You'll see your art in a new light. You’ll feel better and so will I. - Dawn